
We've built ReceiptsAI to name, sort, organize, and categorize your expenses, so you don't have to do it manually. But there are cases where AI simply can't do these things because it lacks context. That's why we've built a better rule system, so you can name, sort, organize, and categorize your bank transactions, receipts, and invoices exactly the way you want, when AI isn't getting it right.
In this article, we'll introduce what we've built and showcase a few common use cases. Jump to the one you need:
What are rules?
A rule is a short sentence with two parts: When these things are true, Then do this.
You choose the When. A rule can check many details of a transaction, including the merchant, the description, whether money came in or went out, how the document reached ReceiptsAI, and who uploaded it. Combine as many as you need. One condition can take several values, such as merchant contains OpenAI or Anthropic.
You choose the Then. A rule can take several kinds of action, such as setting a category or renaming a merchant.
Every rule is shown as that sentence, so the list stays readable. For example: When merchant is Uber and description contains EATS → Meals.
Nothing is changed until you say so. A preview lists the existing transactions the rule would change. Save applies the rule to new transactions only. Save and update also changes ones you've previously uploaded, shown in the preview.
Use cases
Clean up duplicate vendor names
The same vendor rarely shows up spelled the same way twice. In our own statements, Amazon comes in at least six different ways:
- Amazon Web Services EMEA SARL
- Amazon Web Services EMEA SARL, Eesti filiaal
- Amazon Web Services
- AWS
- Aws Emea
- Aws Emea aws.amazon.co
Google Cloud, Microsoft, and Apple often do the same. In our minds, all of these are just one thing: our hosting bill from AWS. So we set up a rule that matches every version, categorizes it as Hosting and Infrastructure, and renames the vendor to Amazon.
When merchant contains Amazon Web Services EMEA SARL, Amazon, or AWS → Hosting and Infrastructure Rename to Amazon
Now the same company stops splitting across your reports.
Merchant names are read off each document, which is why they wobble. A description is matched exactly as it is printed, so prefer it when the merchant name is unreliable.
A rename does not change bank statements you have already uploaded. It applies to statements you upload after you create the rule.
Categorize expenses when AI gets them wrong
AI can read what is on a receipt. It cannot know what that purchase means for you.
We've seen plenty of cases where the line on a bank statement is vague. The biggest offenders are payment apps and marketplaces like Zelle, Venmo, Cash App, PayPal, Square, and Amazon. In these cases, it isn't always clear to your bookkeeper, or to AI, what kind of transaction it is.
Usually, the description carries extra information we can use. If the payments go to a specific person, or happen at a specific time of the month, a rule can land these transactions, receipts, and invoices in the right place in your books.
A Zelle transfer in the first few days of the month, for a set amount, is rent. A similar Zelle transfer later in the month, for a different amount and with a specific person in the description, could be a consulting expense.
Adding that context in rules gets these transactions organized with a one-time setup. Even when the vendor or merchant is the same, your context lets the rule pick the right category.
Use more than one category for the same merchant

Sometimes one merchant name covers more than one kind of transaction. Say you drive for Uber and also order from Uber Eats. Your payouts come in under Uber, and your food orders go out under it. A rule that only looks at the merchant will get one of them wrong every time.
Two rules, each one a sentence, fix that:
- When merchant is Uber and description contains EATS → Meals
- When merchant is Uber and money is coming in → Income
Refunds work the same way. Money going out is the purchase, in its usual category. Money coming back from that vendor can go somewhere else.
Some statements don't print a plus or minus on the amount. On those, the first line can't be marked as money in or money out, so a rule with that condition will not match it.
Categorize payments to one person

Payment apps put many different people under one merchant name. The person is in the description, not the merchant.
When merchant is Zelle and description contains MARIA LOPEZ → Rent
Rent paid to that person is filed on its own. Every other payment under the same merchant is left alone.
Track team expenses by who uploaded them

In a shared account, everyone's receipts land in one place. Uploaded by is the person who added the document, whose mailbox forwarded the email, or who sent it in chat.
A rule can use that to categorize their transactions, or to move their receipts and invoices to the right place, whenever that teammate uploads.
When uploaded by Jordan → Client projects
Only receipts and invoices are moved by a rule. Bank statement lines stay where they are.
Track GST, HST, QST, and PST on Canadian receipts

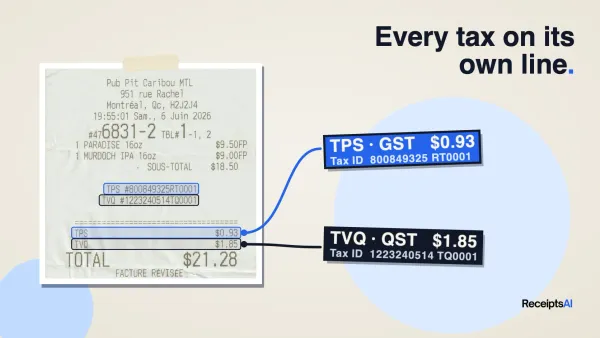
If you run a business in Canada, the tax on a receipt matters as much as the total. You can usually claim back the GST or HST you pay as input tax credits, but on purchases of $100 or more, the CRA expects you to have the supplier's GST/HST registration number (see the CRA's rules). Provincial sales tax in BC, Saskatchewan, and Manitoba usually can't be claimed back, and in Quebec, QST is claimed separately from GST.
ReceiptsAI already records each tax on its own line, with the vendor's registration number for that tax (more on multi-tax capture). Match the tax type in a rule, and those receipts land in their own category.
When tax type is GST or HST → GST/HST input tax credits
That keeps every receipt you can claim input tax credits on in one place, with the registration numbers ready for your accountant at filing time. Rules like this run on receipts and invoices, which is where the tax is printed. Bank statement lines are never moved by a rule.
How to set up automated expense rules
- Go to Settings → Rules and click New rule.
- Under When, add the conditions a transaction has to meet. Click + Add for each one, and choose whether all of them have to match.
- Under Then, add what should happen, such as Change category to Software Licenses.
- Check the Preview on the right. It lists the existing transactions the rule would change, grouped by document, with the new category on each row.
- Click Save to apply the rule to new transactions only, or Save and update to also change the existing transactions in the preview.
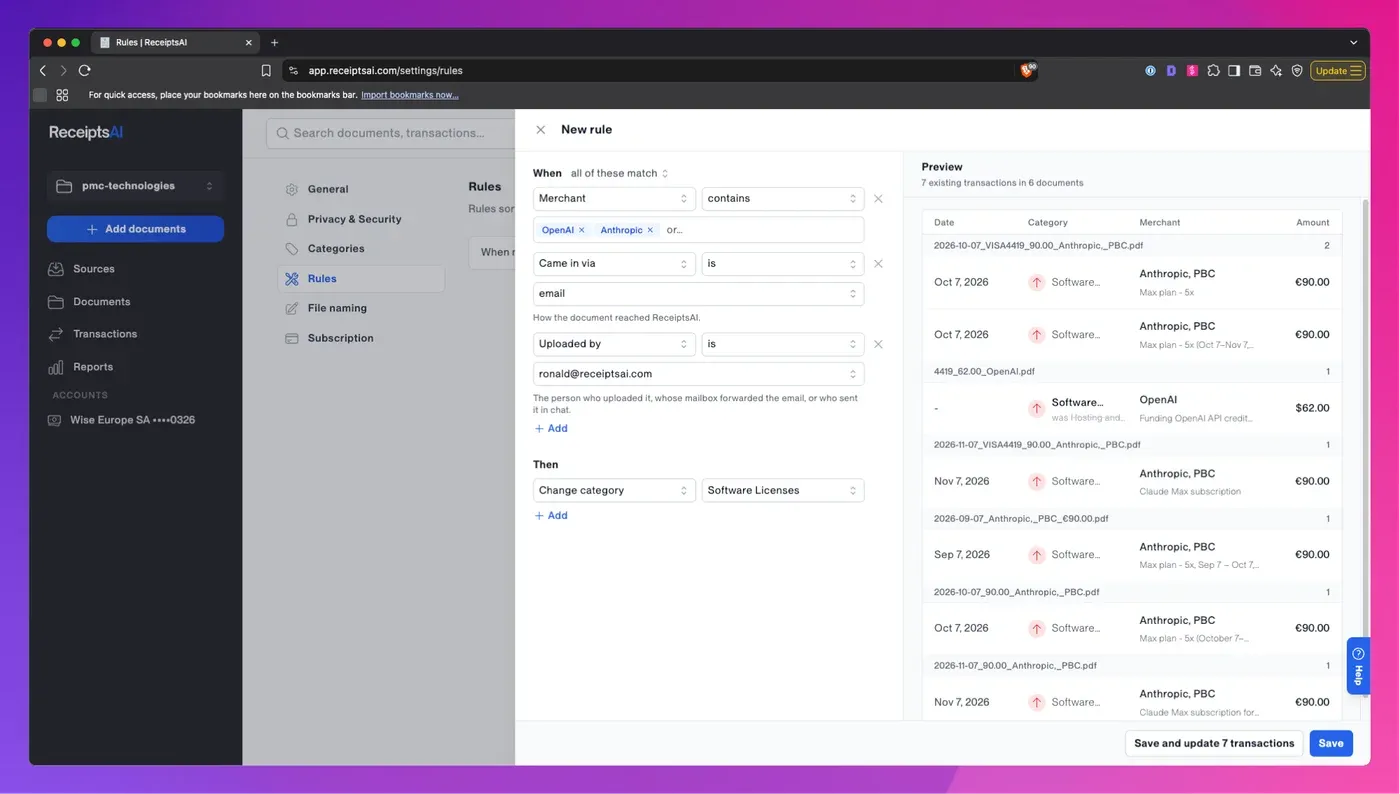
The editor opens as a panel at the side of the screen, so you can create a rule from wherever you are without losing your place.
Back in Settings → Rules, your rules are listed as plain sentences:
Get started with ReceiptsAI
Open Settings → Rules and add one rule from the examples above. If you don't have an account yet, start for free with 30 credits. No card required.
FAQ
Do my existing rules still work? Yes.
Do rules change transactions I've already uploaded? Only if you want them to. Click Save and update to change the matching transactions shown in the preview, or Save to apply the rule to new transactions only.
Can a rule match on more than the merchant name? Yes. A rule can check many details of a transaction, including the description, whether money came in or went out, how the document arrived, and who uploaded it.
How do I set up automated accounting rules? Go to Settings → Rules, click New rule, add your conditions under When and the action under Then, check the preview, and save. See how to set up automated expense rules for each step.
Where do I find rules? In Settings → Rules.
Can rules split a receipt into different categories? Rules work per transaction. To split one receipt across several categories, see line-item categorization.
Does a rename change bank statements I've already uploaded? No. A rename applies to statements you upload after you create the rule.